Old Fence Tutorial.
I love these little fences. They are a tiny bit fiddly to make, but heaps of fun and look really effective wherever you use them. I’ve used them on cards and layouts. Your material should be a medium weight chipboard, something thin enough that you can cut with scissors but thick enough that it’s rigid. Cardstock is too thin and will curl if you are using crackle medium for your finish.

Measure the desired length of your fence. In this case I am making fences 25 cm long. For each section of fence, cut 2 strips x 1cm wide and the length of your fence – in my case 2 x 1cm x 25 cm. Decide how high your fence needs to be for your project. Mine are 10cm high. The pickets are 1cm wide and there will be a 1cm gap between each picket so you only need half as many pickets as the length of your fence. ie 25 cm fence = 12 pickets.
I snipped the tops of each picket so there was a spike on the top, but you can make them any shape you want – square, rounded, or some other fancy way depending on how much work you want to do to them. Then I use fast drying craft glue to attach the pickets to the rails, and place it on my cutting mat as I go, as a guide to get the pickets and rails straight and evenly spaced.

Put enough glue to hold well and make sure the pickets are well attached. There is your raw fence.

I should mention at this time, if you are not using a crackle medium, you need to be careful about the glue you use. Whatever you do use, remember that if you get glue on the area you plan to paint, it will likely discolour the paint and you may find yourself doing a number of coats to get an even finish. If you are using crackle medium like I did, then it isn’t going to matter as you will be painting over it anyway.


The other option would be to attach your pickets with small brads which can also look effective, like large nails, as seen below.

Next paint the base coat for the fence. Deciding what colours you will use will largely depend on the colours in your project. For me – a brown or black background with a white/cream coating probably looks best, but whatever works for you.

I have used the same “Raw Umber” paint that was my base coat on the clock this is going on so I have consistency in colours. Make sure you give a good even coat and pay attention to corners and the sides of the pickets and rails as you want good paint cover all over and won’t want to be touching it up once the crackle medium goes on. Allow the paint to dry completely. Whether you do a second coat largely depends on how porous your chipboard is. If you do a second coat, you can apply it once the first coat is touch dry. Just make sure that the last coat you do is allowed to dry completely.
I’m using Jo Sonjas Crackle Medium. I have tried others but dislike 2 things mainly. 1. The size of the bottle, and 2. The fact that they dry up so quickly in the bottle even with the cap firmly screwed on.
With this product you need to spread it rather than paint it on. Working in small areas at a time, put a good coverage of drops and push the liquid around until it covers the area you want to be cracked. As with most of these products, the thicker you apply it, the larger the cracks. No particular way is right, and for me, the variance in the size of the cracks just adds to the unique look so I don’t fuss too much about an even coverage.
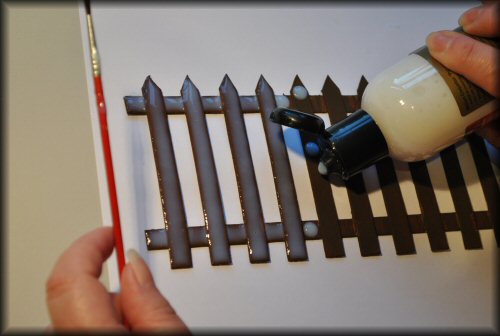


As can be seen from the photo below, the medium starts to dry quickly and is tacky within a couple of minutes, so ensure you work only a small area at a time and that you don’t try to reapply to any area of your project as you will not be able to blend the medium evenly over partly dried areas.

As the medium starts to dry you will see the cracks appearing (see photo below) and it’s likely that your fence will start to curl up a bit. Unless it’s really at risk of folding over on itself don’t worry about trying to flatten it out. This will be where the importance of using a heavy material will become apparent. The thicker the card, the less it will curl.

The photo above shows the Crackle coat after just a couple of hours. However it still has a milky appearance until it is completely dry. DO NOT TRY TO HURRY THE DRYING PROCESS by using a heating tool. You need to allow it to dry naturally.
Once the crackle medium is completely dry, you can flatten out the piece by gently flexing it back into shape. You will hear some cracking as the coating gives way, don’t worry about that. Just work gently to flex the piece flat.


Now it’s time to apply your top coat. You will need to do this carefully otherwise the top coat will fill in the cracks and you will lose the effect.

I’m using Kaiser’s White paint over the top and I will only use one coat so it has that weathered, see through effect. I use a very small brush and only a little bit of paint at a time – dab your brush in the paint and then wipe off most of it. Use very light feathery strokes over the top of the crackle. You will see how little you need after the first few strokes of the brush. Work in one direction only and slowly. I work on the facing area first, allow that to dry and then touch up the edges.

You can see in the photo above where I’ve had too much paint on the brush and it has filled in some of the cracks.

And here is my finished fence!
posted by Maree at 12:16
![]()


 HAVE A GREAT DAY!!!!!!
7 Comments:
wow thats excellent Maree!!
Maree, you are a star! That looks brilliant :)
Such a clever girl you are...thanks for doing this.
looks fabbo maree
OMGFG .....I love it ....i am going to hang the washing out and play with one right now ....freaking awesome tute .....i am adding you to my list of bloggers ..i am officially a stalker =)
((pmsl verification word is rebel...is this describing you my love)))
Wow Maree, those fences are amazing!! :-)
have done one ....pmsl ..need a little more homework prcatise i think b4 i am at your guru level ...but had awesome fun
Post a Comment
<< Home